Install K8ssandra on DOKS
Tip: This topic is specific to K8ssandra 1.4.x. Consider exploring our most recent (and recommended) implementation: K8ssandra Operator. It includes a K8ssandraCluster custom resource and supports single- and multi-cluster Cassandra deployments in Kubernetes, for High Availability (HA) capabilities. See the K8ssandra Operator documentatation.
DigitalOcean Kubernetes or “DOKS” is a managed Kubernetes environment on DigitalOcean (DO). DOKS is a fully managed experience; it handles the management/upgrading of the Kubernetes cluster master as well as autoscaling of “nodes” through “node pools.”
Tip
Also available in followup topics are post-install steps and role-based considerations for developers or Site Reliability Engineers (SREs).Deployment
This topic covers provisioning the following infrastructure resources.
- 1x VPC Network
- 1x DOKS cluster
- 2x Node Pools
- 3x Cassandra Kubernetes workers
- 32 vCPUs
- 64 GB RAM
- 3x Support Kubernetes workers
- 2 vCPUs
- 4 GB RAM
- 3x Cassandra Kubernetes workers
- 3x 2TB Block Storage Volumes (provisioned automatically during installation of K8ssandra)
- 1x DigitalOcean Spaces bucket for backups
Warning
The instance flavors specified here may not be available to all accounts. If these higher capacity instances are unavailable reach out to Digital Ocean support to increase your limits.On this infrastructure the K8ssandra installation will consist of the following workloads.
- 3x instance Apache Cassandra cluster
- 3x instance Stargate deployment
- 1x instance Prometheus deployment
- 1x instance Grafana deployment
- 1x instance Reaper deployment
Feel free to update the parameters used during this guide to match your target deployment. This should be considered a minimum for production workloads.
Provisioning Infrastructure
At this time the K8ssandra project does not have Terraform modules available to assist with provisioning infrastructure. With that being said the steps required to manually provision the infrastructure are outlined below. If you have already provisioned a cluster skip to the Install K8ssandra section.
Tools
| Tool | Version |
|---|---|
| kubectl | 1.17.17 |
| doctl | 1.61.0 |
Make sure to authenticate doctl as we will be using it later.
doctl auth init
Output:
Please authenticate doctl for use with your DigitalOcean account. You can generate a token in the control panel at https://cloud.digitalocean.com/account/api/tokens

Enter your access token:
Validating token... OK
VPC Network
Before creating our DOKS cluster we should create VPC network. It is possible to skip this step, but ultimately this network will be created for you anyway. From the DO console navigate to Networking in the left sidebar then VPC. Click the Create VPC Network button to start the process.
From here choose a datacenter region and configure the Private IP range.
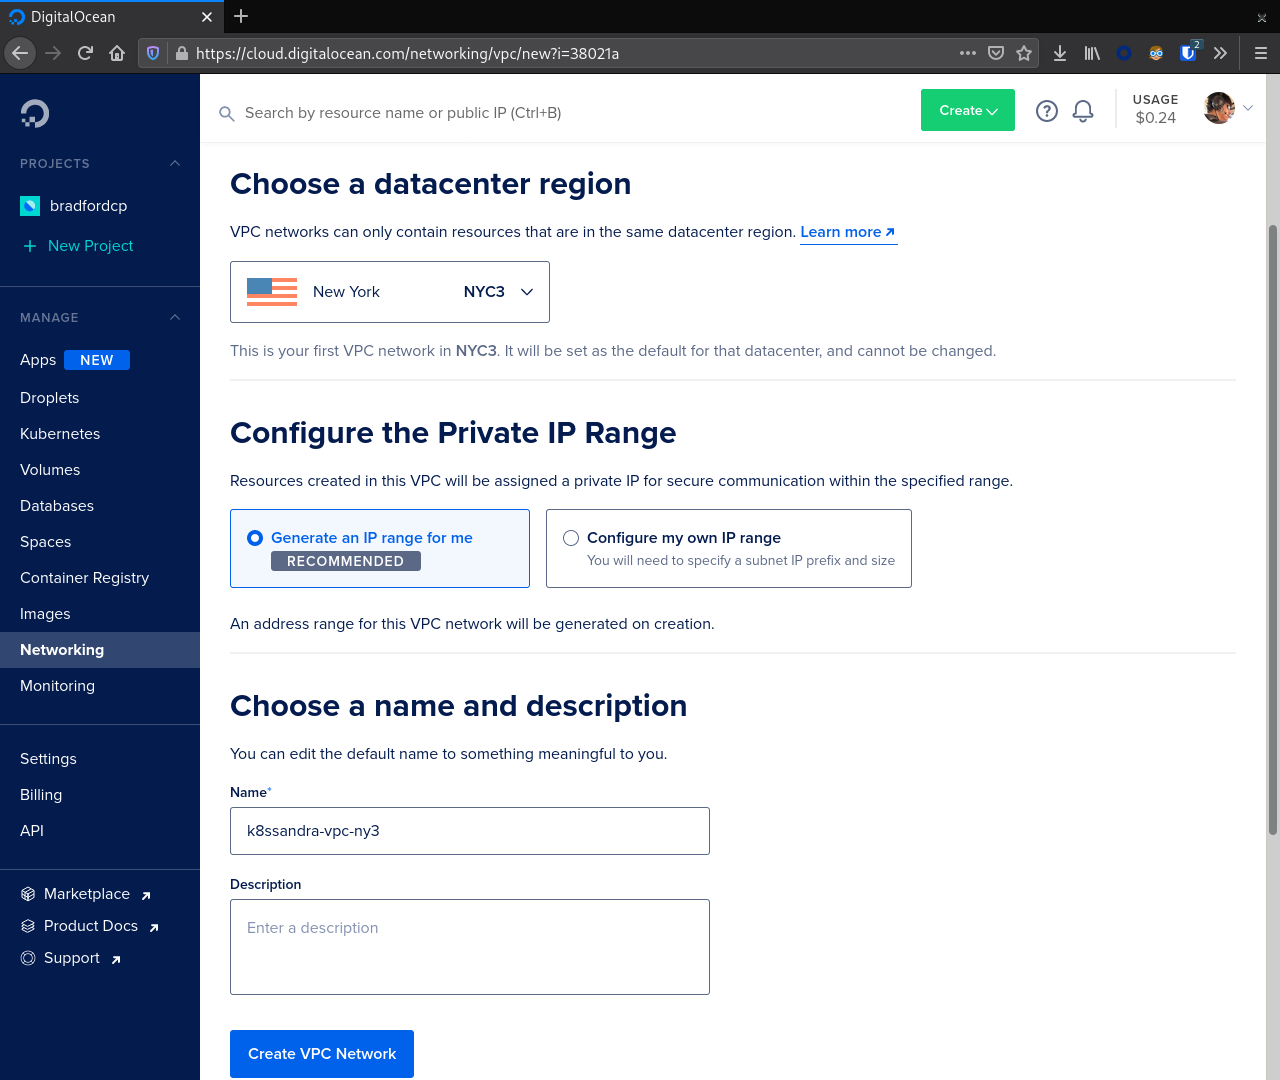
In our example we are using NYC3 and Generate an IP range for me.
Kubernetes Cluster
Next, we navigate to Kubernetes in the sidebar navigation and click Create. First, choose a Kubernetes version and VPC Network.
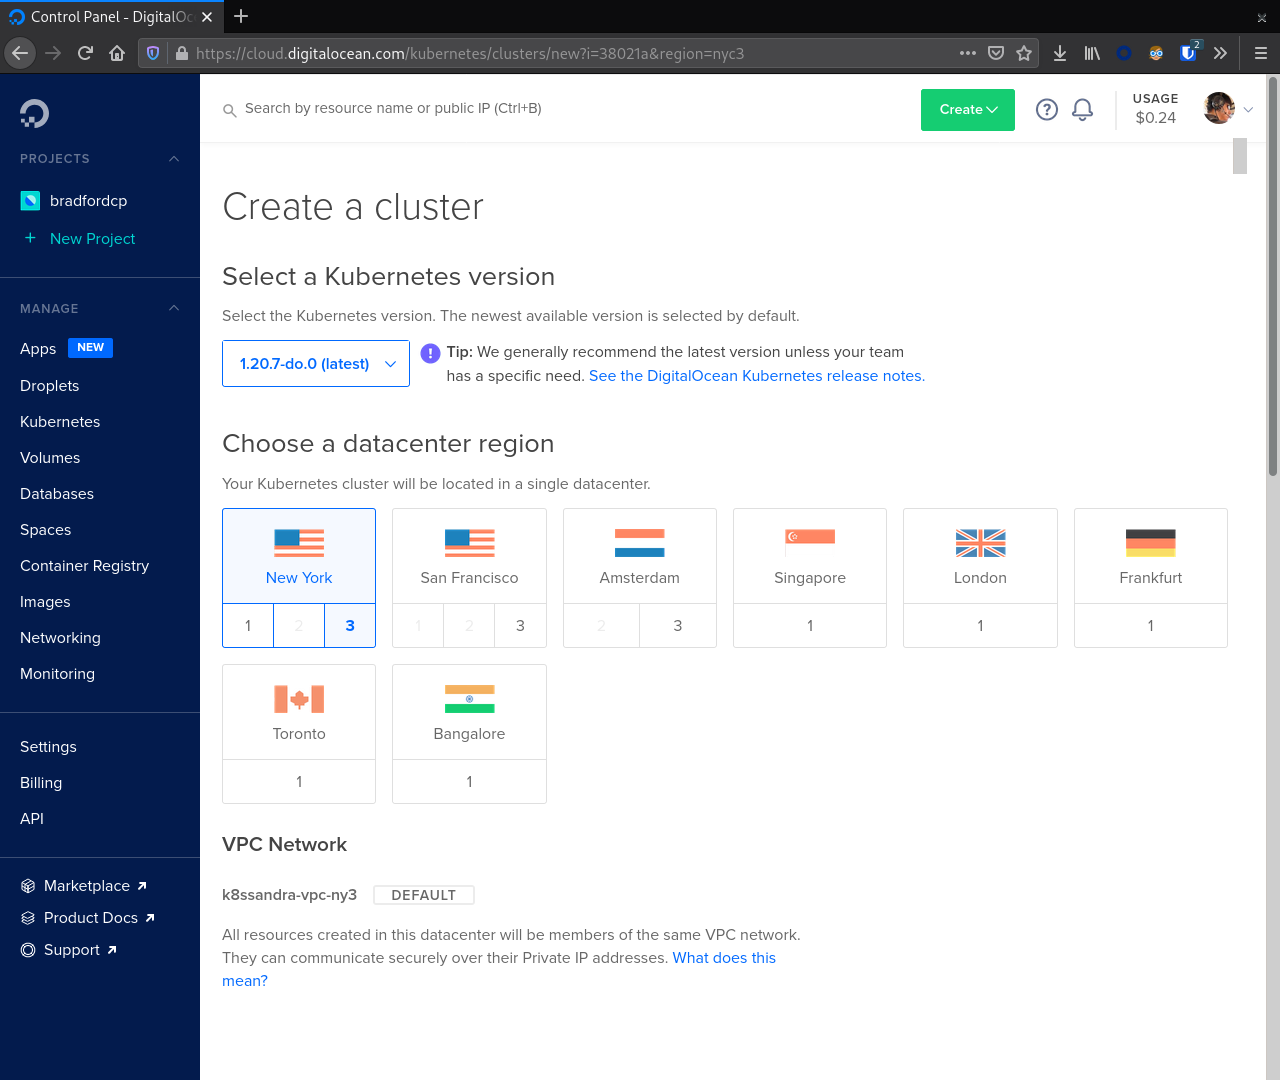
With that selected we now focus on creating our first node pool. In this case we will create a node pool for the Cassandra nodes. This node pool should match the recommended instance size for production. Here we used CPU-optimized nodes with 32 vCPUs and 64 GB RAM.
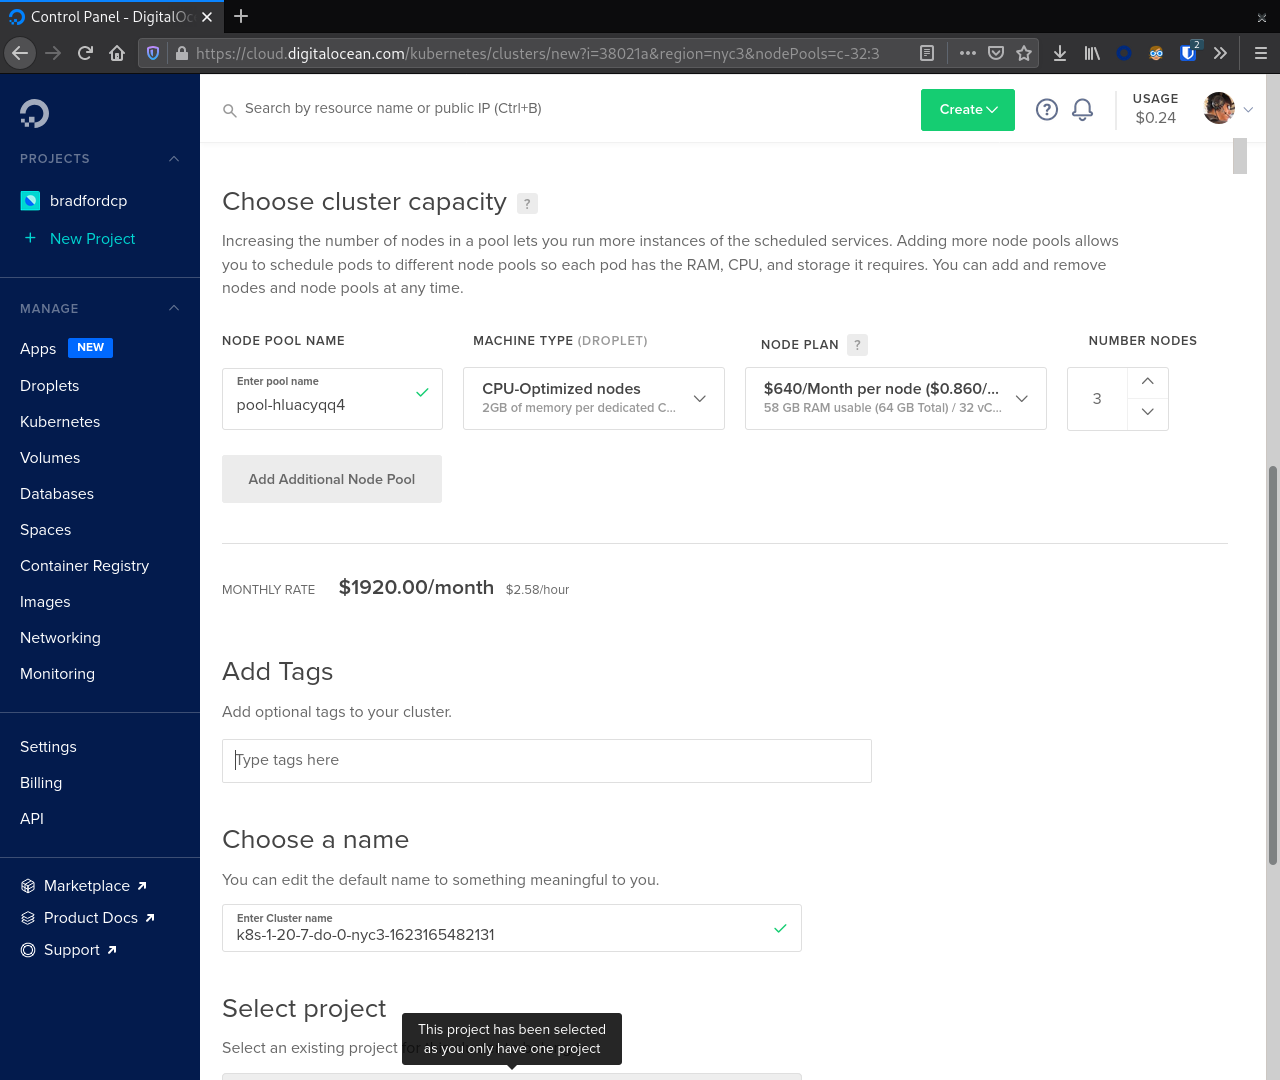
Finally, click Create Cluster to start the provisioning process.
Node Pool(s)
At this point the cluster is provisioning. We need to create a second node pool for running our supporting tools like Reaper, Prometheus, and Grafana.
From the cluster detail screen navigate to the Nodes tab. Next, click the Add Node Pool button.
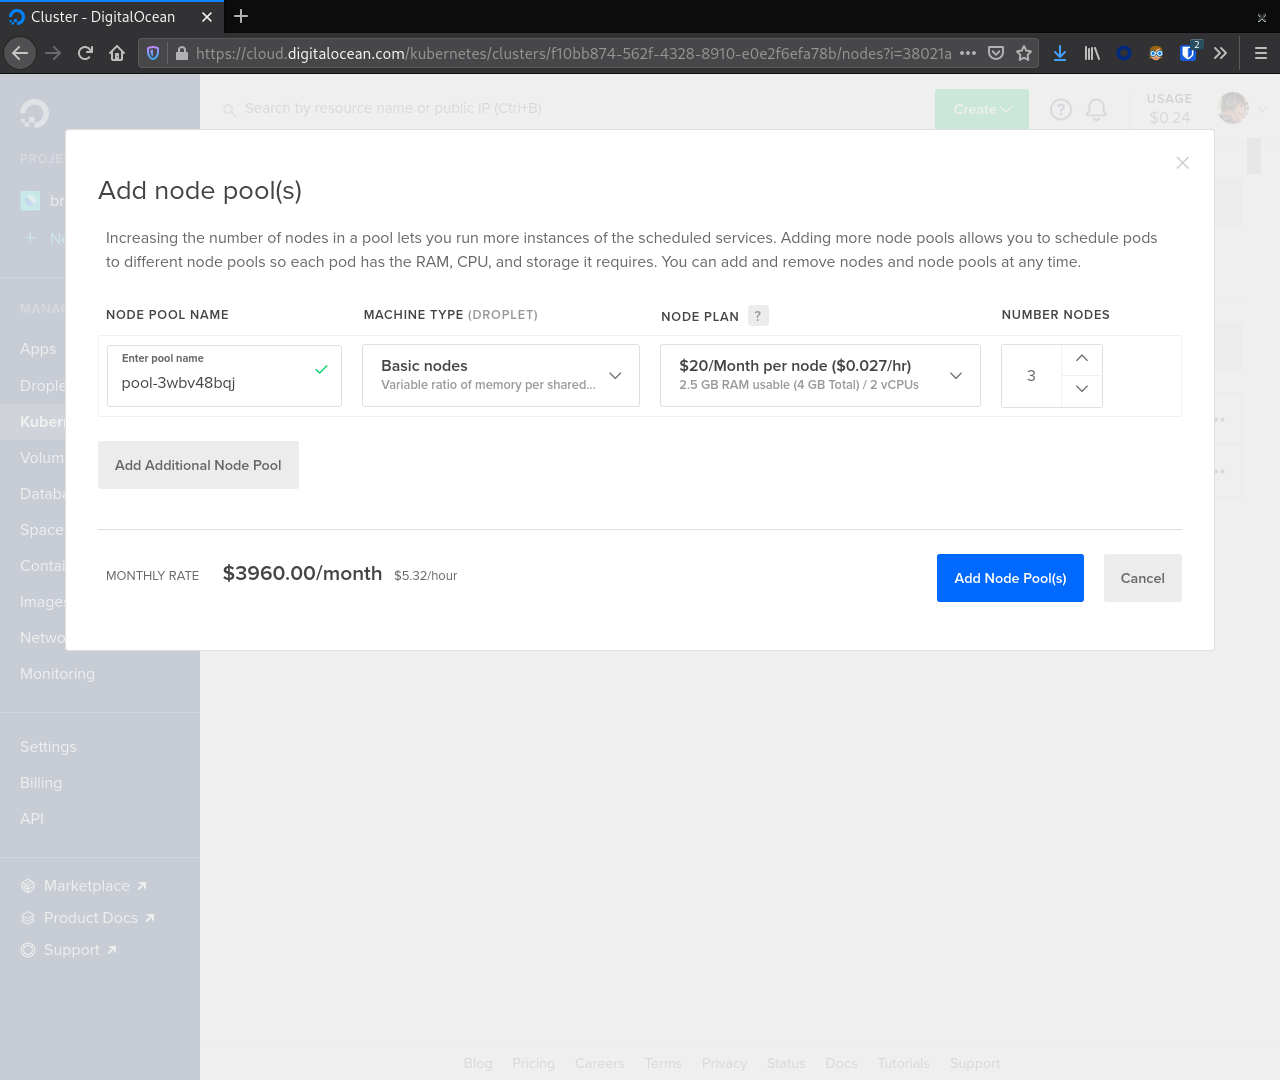
Note that these nodes do not need to be as large as the C* nodes. For our example we selected Basic nodes with 4 GB RAM and 2 vCPUs. We chose 3 nodes for this pool. After selecting the appropriate values here click the Add Node Pool(s) button.
Spaces
While these droplets spin up we can head over to the Spaces section of the sidebar and create a bucket for our Medusa backups. Click the Create button to start the process. Make sure to select a region where your DOKS cluster is running to minimize traffic ingress/egress costs.
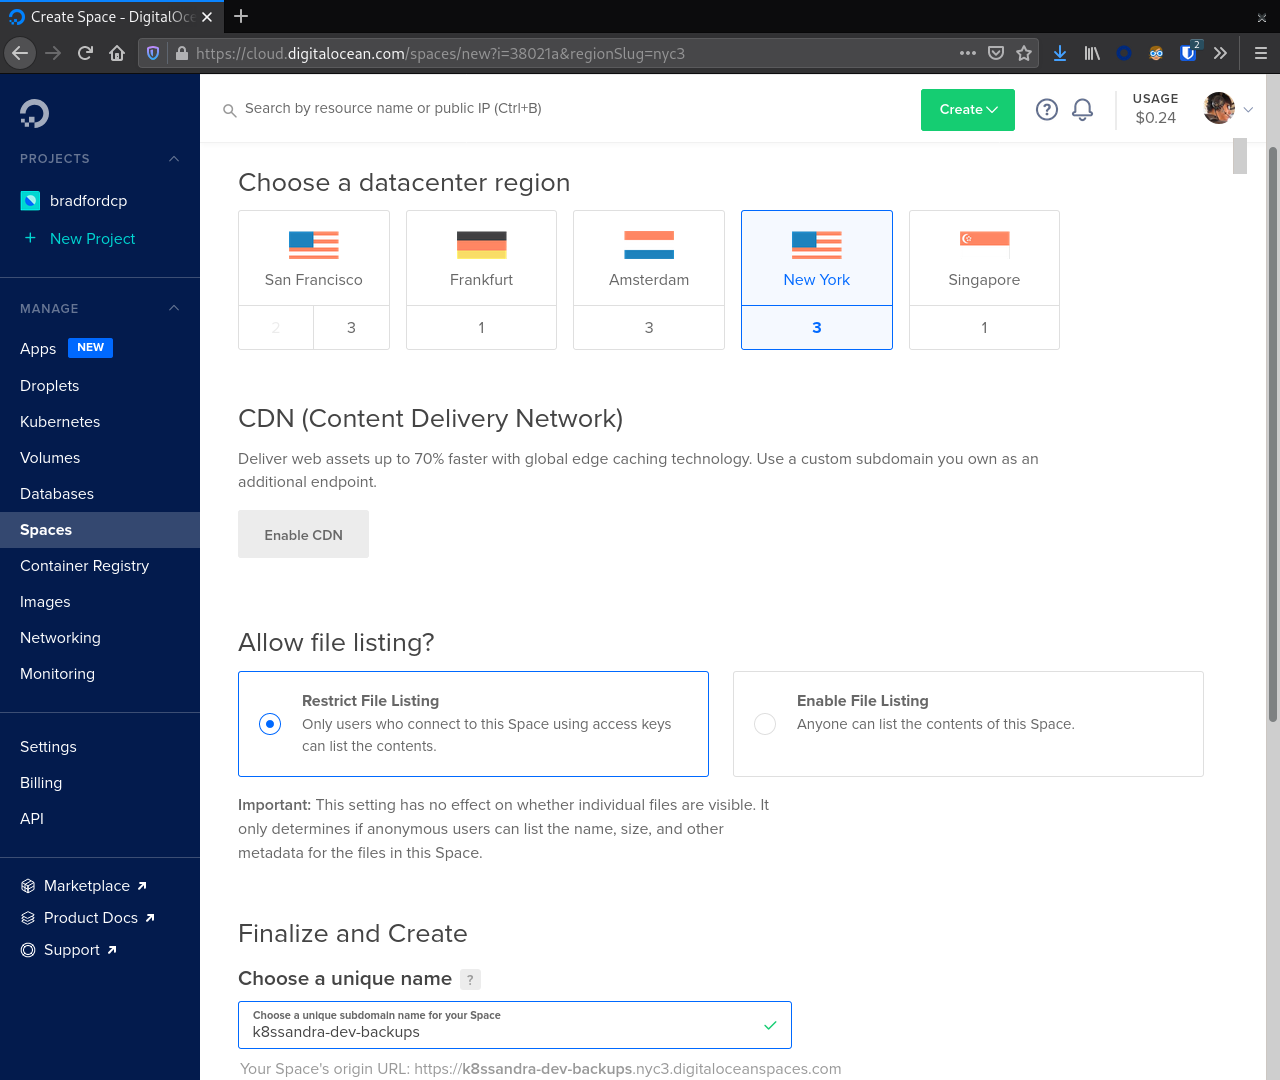
Important
The bucket name must be unique across all of DigitalOcean. Copying the value here will most likely result in a conflict.With a bucket created click the Spaces link in the sidebar again and navigate to the Manage Keys button. In the Spaces Access Keys section create a key that Medusa will use to access our Space.
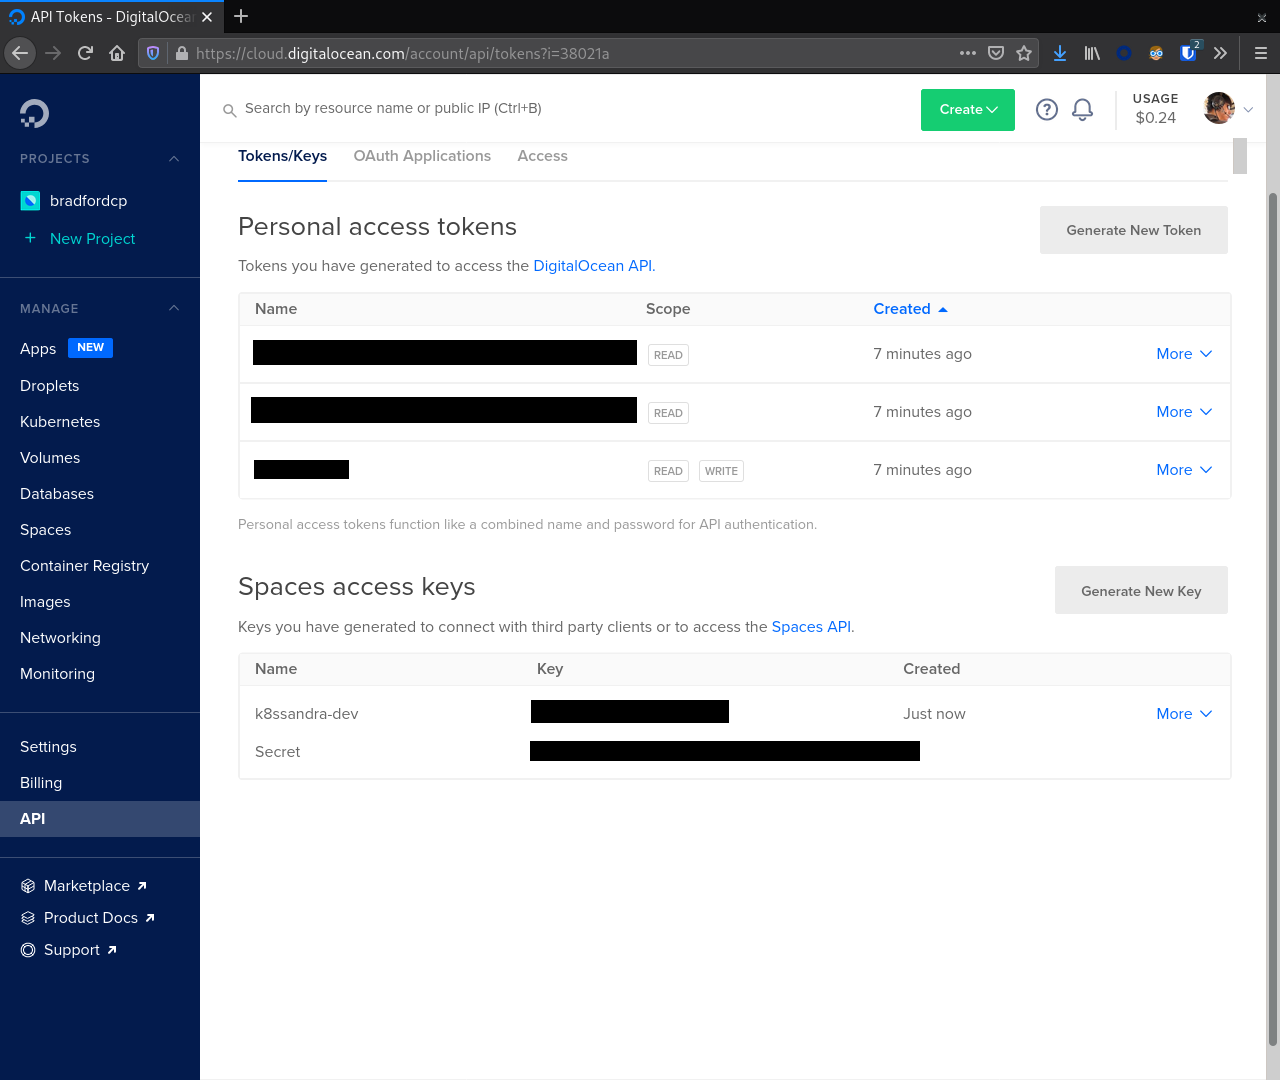
After creating the key note the key id and secret. We will use these values later when configuring Medusa. Failure to do so will require regenerating the secret later.
Retrieve kubeconfig
After provisioning the DOKS cluster we must request a copy of the kubeconfig. This provides the kubectl command with all connection information including TLS certificates and IP addresses for Kube API requests.
# NOTE your kubeconfig command WILL BE DIFFERENT, retrieve the command from the DO console interface.
doctl kubernetes cluster kubeconfig save REDACTED
Output:
Notice: Adding cluster credentials to kubeconfig file found in "~/.kube/config"
Notice: Setting current-context to do-nyc3-k8s-1-20-7-do-0-nyc3-1623165482131
With kubectl configured let’s check connectivity to the cluster and verify versions.
kubectl cluster-info
Output:
Kubernetes control plane is running at https://f10bb874-562f-4328-8910-e0e2f6efa78b.k8s.ondigitalocean.com
CoreDNS is running at https://f10bb874-562f-4328-8910-e0e2f6efa78b.k8s.ondigitalocean.com/api/v1/namespaces/kube-system/services/kube-dns:dns/proxy

To further debug and diagnose cluster problems, use 'kubectl cluster-info dump'.
kubectl version
Output:
Client Version: version.Info{Major:"1", Minor:"21", GitVersion:"v1.21.1", GitCommit:"5e58841cce77d4bc13713ad2b91fa0d961e69192", GitTreeState:"clean", BuildDate:"2021-05-12T14:18:45Z", GoVersion:"go1.16.4", Compiler:"gc", Platform:"linux/amd64"}
Server Version: version.Info{Major:"1", Minor:"20", GitVersion:"v1.20.7", GitCommit:"132a687512d7fb058d0f5890f07d4121b3f0a2e2", GitTreeState:"clean", BuildDate:"2021-05-12T12:32:49Z", GoVersion:"go1.15.12", Compiler:"gc", Platform:"linux/amd64"}
Taint Nodes
With mixed node types available we should apply taints to each node type in order to facilitate scheduling. The larger instances will be tainted with the value app=cassandra:NoSchedule effectively blocking the scheduling of Pods unless they have the taint app=cassandra. In our example deployment here Cassandra nodes are part of the pool named pool-hluacyqq4.
Important
Your node pool names will most likely not match the values above. Make sure you adjust the commands / values appropriately for your environment.kubectl taint node -l doks.digitalocean.com/node-pool=pool-hluacyqq4 app=cassandra:NoSchedule
Output:
node/pool-hluacyqq4-8edt2 tainted
node/pool-hluacyqq4-8edtl tainted
node/pool-hluacyqq4-8edtt tainted
Install K8ssandra
With all of the infrastructure provisioned we can now focus on installing K8ssandra. This will require configuring a service account for the backup and restore service and creating a set of Helm variable overrides.
Create Backup / Restore Service Account Secrets
In order to allow for backup and restore operations, we must create a service account for the Medusa operator which handles coordinating the movement of data to and from DigitalOcean Spaces. As part of the provisioning section a key was generated for this purpose. Plug in the key and secret from the provisioning section in the following file and save the file as medusa_s3_credentials.
apiVersion: v1
kind: Secret
metadata:
  name: prod-k8ssandra-medusa-key
type: Opaque
stringData:
  # Note that this currently has to be set to medusa_s3_credentials!
  medusa_s3_credentials: |-
    [default]
    aws_access_key_id = REDACTED
    aws_secret_access_key = REDACTED
Next submit this file to Kubernetes as a secret.
kubectl create secret generic prod-k8ssandra-medusa-key --from-file=medusa_s3_credentials=./medusa_s3_credentials
Output:
secret/prod-k8ssandra-medusa-key created
Important
The name of the key file within the secret MUST bemedusa_s3_credentials. Any other value will result in Medusa not finding the secret and backups failing.
This secret, prod-k8ssandra-medusa-key, can now be referenced in our K8ssandra configuration to allow for backing up data to DigitalOcean Spaces with Medusa.
Create WaitForFirstConsumer Storage Class
K8ssandra requires a Kubernetes Storage Class that has volumeBindingMode: WaitForFirstConsumer. The default preinstalled do-block-storage storage class has volumeBindingMode: Immediate. We will create a new storage class with the required mode based on the existing version.
apiVersion: storage.k8s.io/v1
kind: StorageClass
metadata:
  name: do-block-storage-wait
provisioner: dobs.csi.digitalocean.com
reclaimPolicy: Delete
volumeBindingMode: WaitForFirstConsumer
allowVolumeExpansion: true
Submit this file to the Kubernetes cluster with:
kubectl apply -f do-block-storage-wait.yaml
Output:
storageclass.storage.k8s.io/do-block-storage-wait created
Generate doks.values.yaml
Here is a reference Helm doks.values.yaml file with configuration options for running K8ssandra in DigitalOcean on DOKS.
cassandra:
  # Version of Apache Cassandra to deploy
  version: "3.11.10"

  # Configuration for the /var/lib/cassandra mount point
  cassandraLibDirVolume:
    storageClass: do-block-storage-wait

    # The recommended live data size is 1 - 1.5 TB. A 2 TB volume supports this
    # much data along with room for compactions.
    size: 2048Gi

  heap:
   size: 31G
   newGenSize: 5G

  resources:
    requests:
      cpu: 31000m
      memory: 55Gi
    limits:
      cpu: 31000m
      memory: 55Gi

  # This key defines the logical topology of your cluster. The rack names and
  # labels should be updated to reflect the Availability Zones where your GKE
  # cluster is deployed.
  datacenters:
  - name: dc1
    size: 3
    racks:
    - name: rack-a
    - name: rack-b
    - name: rack-c

  # Tolerations for Cassandra nodes
  tolerations:
    - key: "app"
      operator: "Equal"
      value: "cassandra"
      effect: "NoSchedule"

stargate:
  enabled: true
  replicas: 3
  heapMB: 1024
  cpuReqMillicores: 1000
  cpuLimMillicores: 1000

medusa:
  enabled: true
  storage: s3_compatible
  storage_properties:
      host: nyc3.digitaloceanspaces.com
      port: 443
      secure: "True"
  bucketName: k8ssandra-prod-backups
  storageSecret: prod-k8ssandra-medusa-key
Important
Take note of the comments in this file. If you have changed the name of your secret, are deploying in a different region, or have tweaked any other values it is imperative that you update this file before proceeding.Deploy K8ssandra with Helm
With a values.yaml file generated which details out specific configuration overrides we can now deploy K8ssandra via Helm.
helm install prod-k8ssandra k8ssandra/k8ssandra -f doks.values.yaml
Output:
NAME: prod-k8ssandra
LAST DEPLOYED: Sat Apr 24 01:15:46 2021
NAMESPACE: default
STATUS: deployed
REVISION: 1
Retrieve K8ssandra superuser credentials
You’ll need the K8ssandra superuser name and password in order to access Cassandra utilities and do things like generate a Stargate access token.
Tip
Inkubectl get secret commands, be sure to prepend the environment name. In this topic’s examples, we have used prod-k8ssandra. Notice how it’s prepended in the examples below. Also, save the displayed superuser name and the generated password for your environment. You will need the credentials when following the
Quickstart for developers or Quickstart for Site Reliability Engineers post-install steps.
To retrieve K8ssandra superuser credentials:
-
Retrieve the K8ssandra superuser name:
kubectl get secret prod-k8ssandra-superuser -o jsonpath="{.data.username}" | base64 --decode ; echoOutput:
prod-k8ssandra-superuser -
Retrieve the K8ssandra superuser password:
kubectl get secret prod-k8ssandra-superuser -o jsonpath="{.data.password}" | base64 --decode ; echoOutput:
PGo8kROUgAJOa8vhjQrE49Lgruw7s32HCPyVvcfVmmACW8oUhfoO9A
Cleanup Resources
If this cluster is no longer needed you may optionally uninstall K8ssandra or delete all of the infrastructure.
Uninstall K8ssandra
helm uninstall prod-k8ssandra
Output:
release "prod-k8ssandra" uninstalled
Destroy Infrastructure
Similar to our provisioning section visit the following console sections (in order) to destroy the underlying infrastructure used during this guide.
- Kubernetes cluster
- Spaces
- Networking => VPC. Note if this is the only VPC in your account it is considered the default and may not be destroyed. You will not be billed for the VPC, just resources within it.
Next steps
With a freshly provisioned cluster on DOKS, consider visiting the developer and Site Reliability Engineer quickstarts for a guided experience exploring your cluster.
Alternatively, if you want to tear down your DOKS cluster and / or infrastructure, refer to the section above that covers cleaning up resources.
Feedback
Was this page helpful?
Glad to hear it! Please tell us how we can improve.
Sorry to hear that. Please tell us how we can improve.